Reasons to set up Gmail for your work email address
If you have a business with a website, chances are you have a business email at your company’s domain. However, if you’re like millions of users around the globe, you have a personal email address with Gmail. Maybe it’s just easier to check your work email and personal email at once, or maybe you simply want to use the great web-based features and Android integration that Gmail offers. Whatever your reason for using Gmail for work, it’s a snap to check (and send) email from your business email address, all while using Gmail’s slick interface.
Best of all, you don’t need to pay for G Suite to get this to work!
What you’ll be able to do when you connect Gmail to your other email address:
Here are a few things you’ll be able to do after setting this up:
- Receive email from your company email straight into your Gmail inbox, automatically.
- Check your work email from anywhere using Gmail’s web view or phone apps.
- Automatically label your company email so you can filter or sort it using Gmail’s filters interface.
- Take advantage of Gmail’s advanced filtering, automatic sorting, and search features for all your emails, including old work emails from before you set up Gmail.
- Send email from your company address within Gmail’s interface, without giving away that you’re sending from Gmail.
- Set up a default “From” address when you send email. This can be your business email address or your Gmail address. Either way, you can always change it later.
Why can’t you just forward your email to your Gmail address?
In short, forwarding an email counts as re-sending it. So if you’re forwarding email that’s spam, it’s the same as if you were sending the spam yourself! Obviously that’s no good, and it can lead to your server being slowly added to Gmail’s blacklist for sending spam to its servers. By fetching your email rather than forwarding it, you avoid the problem of re-sending spam, but you still get your email in Gmail where you want it.
Additionally, when you re-send the email, you’re not always authorized to send email on behalf of the original sender. Depending on Gmail’s spam settings and the original sender, you can even lose emails in transit because Gmail might just block these “unauthorized” forwards. At the very least, you’re more likely to get legitimate emails sent to spam when you use an automatic forwarder. Again, fetching it using the technique below avoids that problem.
Some preliminary notes
This tutorial will cover how to set up Gmail for receiving and sending email from your business email on your company’s domain. It already assumes your web host supports POP3 email connections (most of them do). It also assumes you have access, or can get access, to your web host’s email settings, since you’ll need to know them.
At a few points in this tutorial, we will give specific directions that may be different based on your web hosting service. We’ll call out what might change in asides like this one, so you know what to ask and where to look in case your hosting provider does things differently.
First things first: do check with your web hosting provider to be sure they support POP3 email connections. If your host does not support this, unfortunately you won’t be able to use Gmail to access your work email.
(Are you a Runningfish client? Our example uses all the same settings as our real mail server, so you can just follow this guide to the letter and you’ll be set! Additional notes will appear in italics to clarify things for you. Oh, and by the way — we definitely support POP3 email, so you don’t have to worry about that.)
How to set up Gmail to connect with your company email address
- Open up Gmail on a desktop computer (sorry, no mobile devices).
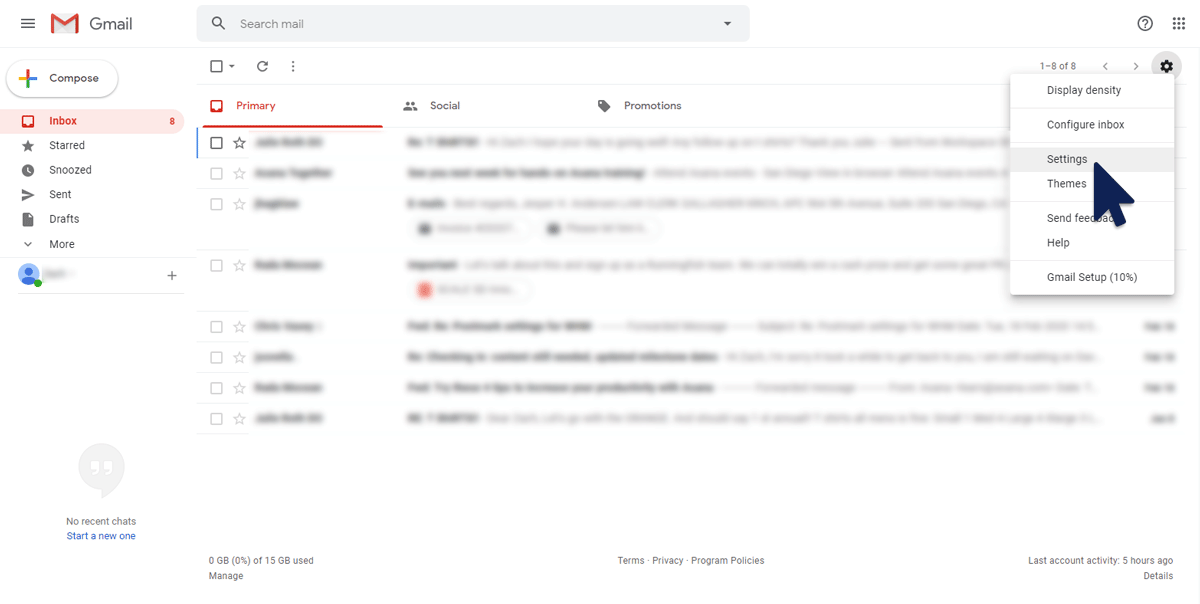
- Click on the gear icon in the upper-right of your inbox, then select “Settings” from the menu.

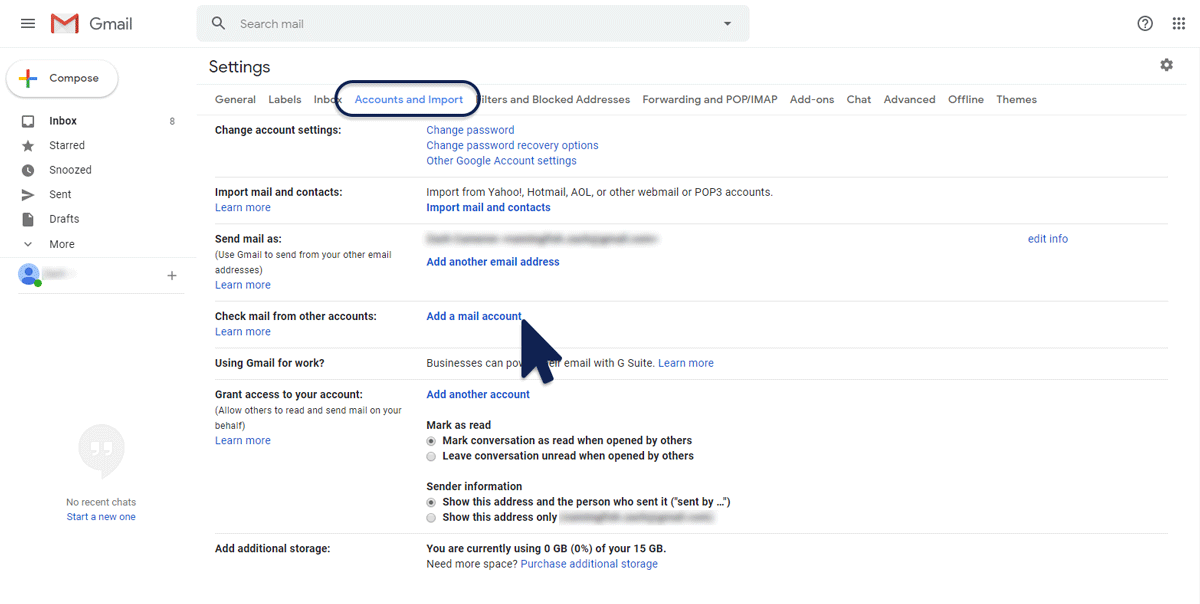
- In the Settings screen, go to the “Accounts and Import” tab.
- Look for “Check mail from other accounts:” and click the “Add a mail account” link in that section. You’ll create a small pop-up window where you can set up the settings you need.
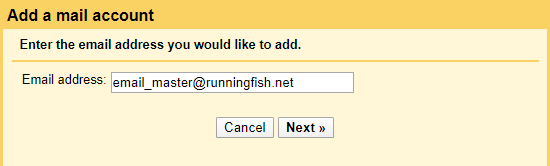
- Enter your desired company email address in the “Email Address” field, then click Next.

- The next screen will say something about “Gmailify”, but it won’t be an option you can choose. Just click the Next button.
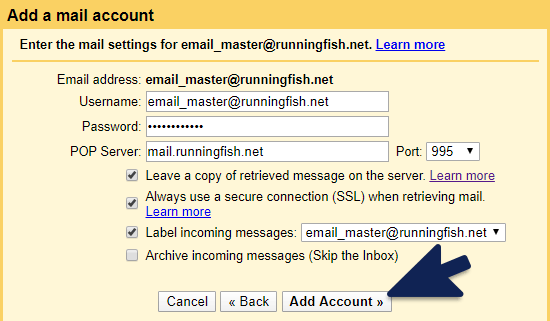
- Here’s where it gets serious. Enter your username and password for your company email (these should be the same ones you currently use in your email or webmail app).
Often your username is your email address, or simply the part of your email address before the @ symbol. Contact your web host or your company’s IT department to get it.
Runningfish clients: your username is your email address! Forgot your password? You can reset it through your webmail portal. Need more help? Email us and we can walk you through it.

- Enter the server name and port for your email server. A common server name is mail.yourcompany.com and Gmail’s dropdown list has all possible ports.
This is definitely a piece of information you will need to get from your web host or IT department, since server names and ports differ between hosting providers.
Runningfish clients: your mail server is mail.yourcompany.com (whatever your company’s website is), and the port will always be 995.
- Once you have all the credentials, check the box labeled “Leave a copy of retrieved message on the server.”
- Check the box “Always use a secure connection (SSL) when retrieving mail.”
- Optionally, if you want to label, sort, or filter your incoming company email in any way, you can check the box labeled “Label incoming messages:”Runningfish clients: this is optional for you as well. If you get personal email to your Gmail account, it’s highly recommended that you label work emails so you can differentiate!
- Do not check the box called “Archive incoming messages”! That will cause all your emails to be immediately archived, and you won’t see any of them!
- With all the boxes checked, click the Add Account button. If your credentials are correct, you’ll be taken to the next screen. If you get an error, double-check your username, password, mail server name, and port, and try again.
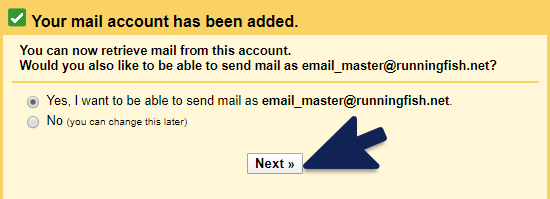
- If you want to send email from your company address (and why wouldn’t you?), make sure the radio button shows “Yes, I want to be able to send email as…” and click Next.

- On the next screen, add your name into the Name field (or something else, if you want your company’s email Name to be different from your actual name).
- Leave “Treat as an alias” checked, and click the Next Step button.
A quick note: there are some circumstances in which you might not want to treat your Gmail as an alias. You can click the “Learn more” link to see Google’s short article on why you might and might not want to treat your email address as an alias. For most cases, an alias is what you want.
- Almost done! Just enter the same username and password from before into the Username and Password field.
- Enter your company’s outgoing email server name and port number (note: this might be different from the one you used earlier!) Common outgoing server names are mail.yourcompany.com and smtp.yourcompany.com. Gmail, once again, has all the possible outgoing server ports in the drop-down list.
Again, server names and ports differ between web hosts. Check with someone before accidentally locking yourself out because you tried too many combinations!
Runningfish clients: the server name is the same as before (mail.yourcompany.com) and the port is always 465.

- Use the recommended secure connection type (unless your company’s IT department or your web host says otherwise). Then click Add Account.
- Finally, you need to check your company email address for a verification email. (No, you can’t just check your Gmail yet, the sync isn’t active until you open the verification email.) You can either copy/paste the code into the field or click the link in the email.Either way, once you’ve verified the email address, it should show up in the Accounts and Import tab of the Settings screen. Look for the “Send mail as:” section and the “Check mail from other accounts:” section.


How to customize Gmail for your work email
Once you have connected your email accounts, there are still a couple tweaks you can make to get things just how you like them. All of these are optional, but they can make your life a lot easier depending on how you plan to use Gmail for your work email.
- Make sure you’re still in the “Settings” screen under the “Accounts and Import” tab. If you went back to your inbox, you can get there by clicking the gear icon, then selecting “Settings” from the menu, and finally, clicking the “Accounts and Import” tab.
- First, decide what email address you want to be your default. The default email is the one you will automatically use when composing a new email. (You can always change this per-email once you’ve started composing, but this is the default.If you’re only using Gmail for your work, we suggest setting your default to the new work address, like we’ve done in the example screenshot. If you use it for work and personal email, you might want to keep it defaulted to your Gmail address.

- Next, decide what email address your replies should use. You can either have your replies always come from your default address (i.e. the one you just chose above) or you can have the replies come from whatever email address you received the original email from.Again, if you only plan to use Gmail for work, as a web-based interface for your work email, you might want to make sure all your replies come from your work address, just to be consistent. If you use it for personal stuff too, select “Reply from the same address the message was sent to.” That way replies to your work email goes through your work address, and replies to your personal email go through your Gmail address.

- Finally, set your email signature. Go to the “General” tab of the Settings screen for this. You can set a different signature per email address, which is really useful if you’re using Gmail for work and personal use.Runningfish clients: you can just copy/paste your custom email signature from an old email into the box. Can’t find your email signature? Having trouble getting it to work in Gmail? Contact us and we can help.


Conclusions
Gmail’s interface is a great way to access your work email, securely, from anywhere. We hope this tutorial helps you get set up!
Does your business need an email or website upgrade? Our web hosting is super fast, with unlimited free company email addresses and free technical support. Get in touch with us to schedule a meeting or call.